

Use the Authorization Code Grant Type
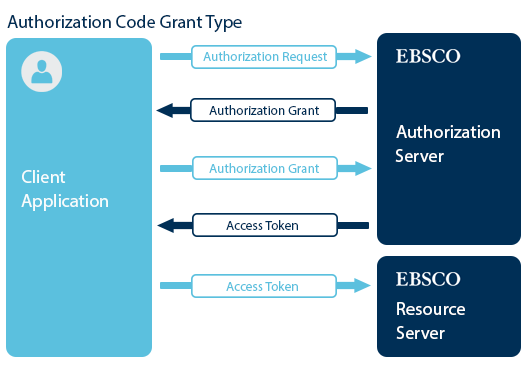
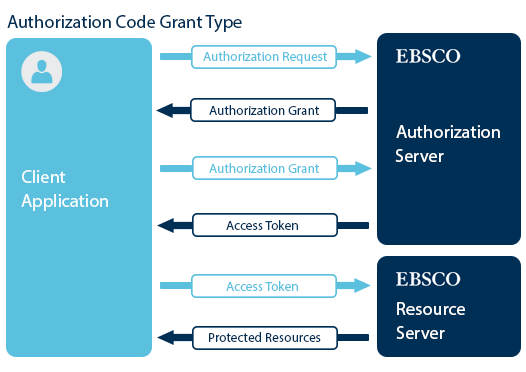
OAuth 2.0 describes a number of grants (methods) for a client application to gain access to the resource owner's account. The grant type depends on the use case. In this example, we will use the authorization code grant type. The authorization code grant type uses an authorization server to gain access to the resource owner's protected resources. The client application directs the resource owner to the authorization server. If not already authenticated, the authorization server prompts the resource owner for credentials by presenting an interface where the user can approve or deny the access. If approved, the authorization server responds to the client application through a redirect URL with an authorization code. The redirect url is defined when the client application is registered. The client application can then use the client application credentials (client ID and client secret) and the authorization code to receive an access token from the authorization server. Finally, the access token can be used to access the protected API endpoints on the resource server. We will describe the authorization grant code process in terms of roles in the process:
- Resource Owner - The person/owner of the data that needs to give permission for access.
- Client Application - The third party application that is trying to gain access to the resource owner's data.
- Authorization Server - Presents the interface to the resource owner where the resource owner can approve or deny access. Issues authorization codes and access tokens.
- Resource Server - Hosts the protected resources.
The authorization code grant type is used for applications that are running on a web server, browser based and mobile apps. We will describe the authorization code OAuth 2.0 grant type process below.
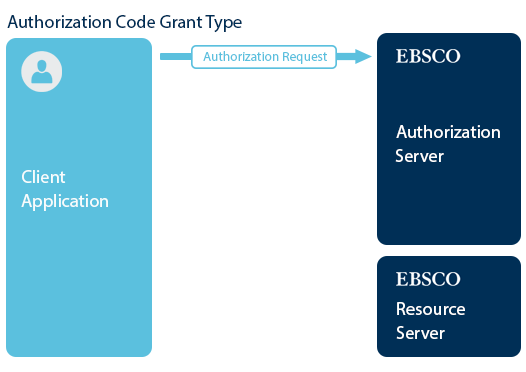
Make an Authorization Request to the Authorization Server
The first step in the OAuth 2.0 authorization code grant type process is for the client application to make an authorization request to the authorization server. The authorization request to the authorization server needs the following parameters:
- client id - The client id given to the application upon registration.
- response type - OAuth 2.0 response type value that determines the authorization processing flow to be used. When using the authorization code grant type flow, this value is code.
- redirect url - Redirect URI that the response will be sent to. Note: A client which has only one redirect uri registered would not be required to provide a value for this parameter. If there are more than one registered, then it is required (not currently supported).
- scope - OpenID connect requests MUST contain the openid scope value. Refresh token requests must contain offline_access scope value.
Code Snippet for a Client Application Authorization Request (Node.js):
res.redirect(
  'https://auth.ebsco.zone/api/dispatcher/oauth/authorize?client_id=${CLIENT_ID}&scope=${AUTH_SCOPE}&response_type=code&redirect_uri=https:${REDIRECT_URI}'
);
After the authorization request is sent, an authorization interface will appear.
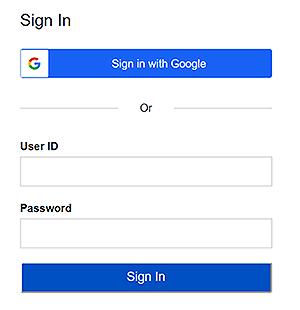
Grant Access to the Protected Resources
The resource owner enters a username and password and clicks the sign in button provided on the authorization window to grant access to the resources.

This action sends the authorization grant from the authorization server to the client application through the redirect url specified when the client application was registered. The client application receives the authorization grant with the authorization code. The client application can use the authorization code when requesting an access token. Essentially, this part of the process is getting the user's permission to access protected information.

Code Snippet for a Client Application Accepting an Authorization Code (Node.js):
router.get('/oauth-callback', function(req, res) {
   /* Authorization Code */
   let code = req.query.code;
}
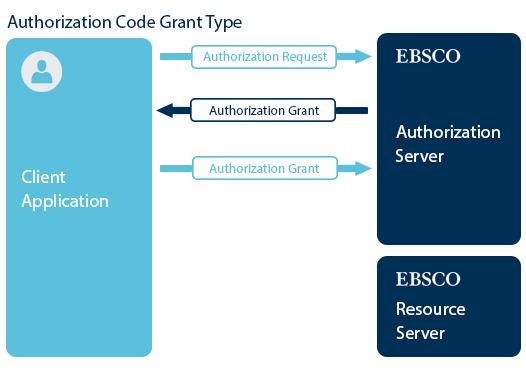
Make an Authorization Grant Request to the Authorization Server
The client application then makes an authorization grant request to the authorization server with the authorization code. The authorization grant request is used to request an access token from the authorization server.
Code Snippet for a Client Application Authorization Grant Request (Node.js):
let digested = new Buffer(`${CLIENT_ID}:${CLIENT_SECRET}`).toString('base64');

// Form the Request
var access_token_options = {
    method: 'POST',
    url: 'https://auth.ebsco.zone/api/dispatcher/oauth/token',
    headers: {
        'Cache-Control': 'no-cache',
        Authorization: `Basic ${digested}`,
        'Content-Type': 'application/x-www-form-urlencoded'
    },
    form: { grant_type: 'authorization_code', code: `${code}`, redirect_uri: `${REDIRECT_URI}` }
};

// Send the Request
request(access_token_options, function (error, response, body) {
    if (error) throw new Error(error);
}
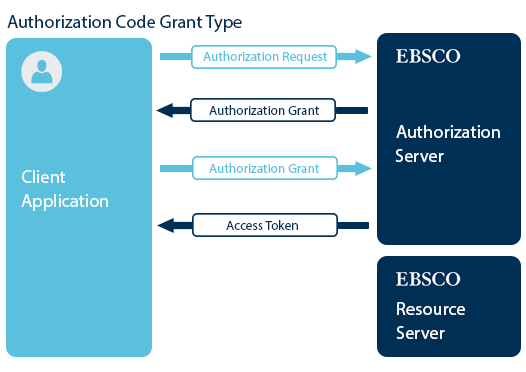
Authorization Server Returns an Access Token
After receiving the authorization grant request with the authorization code from the client application, the authorization server responds with an access token to the client application. The client application can extract the access token from the reponse.
Code Snippet for a Client Application Extracting an Access Token from the Authorization Server Response (Node.js):
request(access_token_options, function (error, response, body) {
   if (error) throw new Error(error);
   let body_json = JSON.parse(body);
   let access_token = body_json.access_token;
}
Use the API
Now that the client application has an access token, the application is free to make API requests! All requests to the API from the client application should have an access token in the header.
Code Snippet for the Client Application Sending a Request to the API using the Access Token (Node.js):
// Form the Request
let options = {
    method: 'GET',
    url: 'https://apis.ebsco.com/discoveryapi/searchPreviews',
    qs: {
       context: 'aaa.bbb.ccc',
       query: '123',
       lang: 'en-us'
    },
    headers: {
       Accept: 'application/json',
       Authorization: `Bearer ${access_token}` }
 };

 // Send the Request
 request(options, function (error, response, body) {
     if (error) throw new Error(error);
 });
Then, the protected resources that the client application has requested are received from the API.
Code Snippet for the Client Application Using the Protected Resources Received from the API (Node.js):
request(options, function (error, response, body) {
    if (error) throw new Error(error);

    // Render the Response
    res.render('request',{
	    data: {
	       request: JSON.stringify(options, null, 2),
	       response: JSON.stringify(JSON.parse(body), null, 2)
	     }
   });
 });
Authorization code grant type flow is one of the more common grant types used and it is optimized to keep the client credentials private. The end result of all the grant types is an access token. Now that you know how to obtain your access token, try to make some API requests!